FAQs
Find quick answers to the most-asked questions.
Replacement Filters
Only potable drinking water should be filtered through your Brita® Pitcher. Do not filter any other liquids including alcohol, juice, or non-potable water.
Elite™ (Blue) Filter:
- Insert the filter into the reservoir by lining up the groove in filter with the ridge in the pitcher’s reservoir. Press firmly to ensure a tight seal.
- Add cold tap water. Discard your first three containers worth of filtered water. (Or, use it to water plants!) It’s normal for carbon dust to appear in your first few fillings.
- Replace filter as recommended to maintain optimal performance.
Original(Standard) (White):
- Flush your filter with cold water for 15 seconds.
- Insert the filter into the reservoir by lining up the groove in filter with the ridge in the pitcher’s reservoir. Press firmly to ensure a tight seal.
- Add cold tap water. Discard your first three containers worth of filtered water. (Or, use it to water plants!) It’s normal for carbon dust to appear in your first few fillings.
- Replace filter as recommended to maintain optimal performance.
How to change your Stream (Gray) Filter:
- Flush your new Brita Stream® Filter with cold water for 15 seconds.
- Insert filter into filter cage with blue ring facing up. Press filter until it clicks.
- Install filter cage onto lid with a firm twist.
- Activate electronic indicator, fill pitcher and enjoy great-tasting water.
It's important to change your filter as recommended for optimal performance. If you have hard water, you may need to change filters more often. Use your cling calendar, or activate your electronic filter change indicator, when you install a new filter to help keep track of your usage. Filter replacement depends on filter and product type.
Pitcher and Dispenser Filters
- Brita® Original (Standard) (White) Filter: Every 40 gallons (about 2 months)
- Brita Elite™ (Blue) Filter: Every 120 gallons (about 6 months)
- Brita Stream® (Gray) Filter: Every 40 gallons (about 2 months)
Bottle Filters and Faucet Mount Filters
- Brita® Premium Filtering Water Bottles: Every 40 gallons (about 2 months)†
- Brita® Water Filter Faucet System Model SAFF-100: Every 100 gallons (about 4 months)
- Brita® Water Filter Faucet System Model FF-100: Every 100 gallons (about 4 months)
Time estimates for Brita® pitchers, dispensers and Water Filter Faucet Systems are based on 11 glasses per day for an average household. Approximate timing for Brita® Premium Filtering Water Bottles is based on 64 ounces per day.
All Brita® filters are certified to reduce chlorine taste and odor for great-tasting water. Some of our filters also reduce health contaminants such as copper, cadmium, mercury, and lead. Substances that Brita® products filter may not be in all users' water. Note: For fluoridated municipal tap water, Brita® filters keep a healthy level of fluoride, a water additive that promotes strong teeth.
This page lists all the contaminants our filters are certified to reduce or remove for great-tasting water.
Brita® Original (Standard) Filters and Brita Elite™ Filters are compatible with all Brita® Pitchers and Dispensers.
If you have an LED indicator with lights, press firmly and hold the RESET button for 5–10 seconds. The green, yellow and red lights should blink in unison. Do not release the RESET button until the lights stop blinking. If pressing the RESET button is difficult, use a capped ballpoint pen to apply pressure. To test your indicator, pour out a glassful of water. You should see a blinking green light.
On older models, press the RESET button firmly for 5 seconds. For newer models, you can press the STATUS button at any time to determine if your indicator is working.
For a snug fit, find the groove in your Brita® Filter and the ridge in the reservoir. Line up the groove with the ridge and press down firmly to ensure a tight fit. Watch this set-up video for tips.
Elite™ Filters should take, at most, 10–15 minutes to filter the reservoir of water in your pitcher or dispenser. One common cause of slow filtering is high levels of sediment in tap water, which occurs in some U.S. households. Sediment such as sand or rust can quickly clog a filter, affecting a filter’s performance and shortening its lifespan. If your water containers high levels of sediment, you may need to replace the Elite filter more frequently to maintain the flow rate. You may also consider installing a total home or under-the-sink filtration system from the Brita® PRO line.
Aeration can also slow filtering. If you experience slow filtering when you fill the reservoir, avoid fully opening your faucet to a full stream. Also, be sure to avoid streaming tap water directly onto the top of a filter.
The shelf life of an unused Brita® filter is indefinite as long as its pouch is intact and sealed. However, we do recommend pre-soaking older Original (Standard) filters in water for 15 minutes before using.
Brita® pitchers and dispensers have three different styles of filter indicators—Pitchers WITH Max Fill Line, Pitchers WITHOUT Max Fill Line, and sticker filter indicators. Find instructions below to match your indicator type, so you'll always know when it's time for a filter change.
Pitchers WITH Max Fill Line
The filter indicator lets you know when it’s time to replace your filter. It activates when the lid is opened for 5–8 seconds (based on size of reservoir) and measures water use by counting the number of times the reservoir is filled.* The green light will blink next to the filter you’ve selected, indicating a fresh filter. The red light will blink when your filter has reached the end of its certified life, indicating that it’s time to replace the filter. See instructions below.
Setup for Original (Standard) Filters (White)
-
To reset the indicator, press the STATUS button and hold it down. If using an Original (Standard) Filter (white in color), hold down the STATUS button for 2 seconds, then release. All lights will blink simultaneously twice, then the green light next to STANDARD FILTER will blink three times. This indicates that the Original (Standard) filter mode (40 gallons) has been selected.
-
If you accidentally select the incorrect mode, repeat the step 1 instructions above until you successfully select the mode that correlates with the filter being used.
-
The indicator light will blink after each time you fill the reservoir and close lid. A blinking green light indicates that your filter is good.
-
Check filter life status at any time by pressing Status button for 1 second and releasing. The light corresponding to your current filter status will blink for 1 second.
-
When 0% of the filter life remains, the red light next to REPLACE will blink, indicating that the filter should be replaced. Replace the filter and reset the indicator (see step 1).
Setup for Elite™ Filters (Blue):
-
To reset the indicator, press the STATUS button and hold it down. If using the a Brita Elite™ Filter (blue in color), hold down the STATUS button for 6 seconds. Do not release until the green light next to Elite™ FILTER has blinked green three times by itself. This indicates that the Elite™ Filter mode (120 gallons) has been selected. Note: Older pitcher models may say Longlast+ instead of Elite™, but both are programmed for 120 gallons.
-
If you accidentally select the incorrect mode, repeat the step 1 instructions above until you successfully select the mode that correlates with the filter being used.
-
The indicator light will blink after each time you fill the reservoir and close lid. A blinking green light indicates that your filter is good.
-
Check filter life status at any time by pressing Status button for 1 second and releasing. The light corresponding to your current filter status will blink for 1 second.
When 0% of the filter life remains, the red light next to REPLACE will blink, indicating that the filter should be replaced. Replace the filter and reset the indicator (see step 1).
Tips for Accurate Tracking
- Open the Fill Lid completely. Always fill the reservoir with water all the way to the provided “Max Fill” line. Close the Fill Lid.
- Only keep the Fill Lid open for more than 5 seconds if you are filling the reservoir with water. Always fill to the Max Fill line to ensure accuracy, and open the reservoir lid only when filling with water.
- ALWAYS wait until the reservoir is empty before refilling.
A note about LAKE, METRO, and SOHO PITCHERS (Models OB58, OB11): The filter indicator for these pitchers is activated when you pour, and measures water use based on 8 fl. oz. pours. To fill the Lake Pitcher, place center Fill Lid under faucet and fill the reservoir until the Fill Lid closes. Allow water to filter completely before pouring. The light will blink after water is poured from the pitcher. A blinking green light indicates that the filter is good.
Pitchers WITHOUT Max Fill Line The filter change indicator lets you know when it’s time to replace your filter. It is activated each time you pour, and measures water use based on 8 fl. oz. pours. A green blinking light indicates that the filter is good. A yellow light indicates the filter should be replaced soon, while a red light blinking indicates the filter should be replaced. Filter performance is not certified after 40 gallons. Changing your filter regularly helps ensure you have cleaner, great-tasting water.
Reset your filter change indicator each time you replace your filter:
-
To reset, press the “RESET” button (on some models called the “STATUS” button) below the lights on the indicator.
-
Release the button when the green light blinks.
-
On the Electronic or Volumetric fill models, the indicator light will blink after every time you fill the reservoir and close the Fill Lid. On volumetric pour models the indicator light will blink after every time you pour from the pitcher.
-
When 0% of the filter life remains, the red light next to REPLACE will blink, indicating that the filter should be replaced. Replace the filter and reset the indicator (see step 1).
Sticker Filter Indicator
The filter indicator lets you know when it’s time to replace your filter. Timing estimates are based on average household usage.* Changing your filter regularly helps ensure you have cleaner, great-tasting water.
- For all Brita® pitchers, dispensers and Water Filter Faucet Systems, timing estimates are based on 11 glasses per day for the average household. Approximate timing for Brita® Premium Filtering Water Bottles is based on 64 ounces per day.
Blue Brita Elite™ Filters last up to six months (120 gallons) on average, three times longer than our Original (Standard) Filters. If you purchased your Brita® pitcher or dispenser before 2019, your filter change indicator may not track Elite™ Filter life. The following questions address how to track Elite™ Filter life for these older models:
I have an electronic filter indicator. How do I track my Brita Elite™ Filter life?
If the electronic filter indicator on your pitcher or dispenser lid looks like the image below, then you’re all set to track Elite™ Filter life. Instructions are in the User Guide. If your electronic filter indicator does not look like the image below, it can only track the filter life of Original (Standard) Filters, and not Elite™ Filters. To track your filter life, you can sign up for personalized filter change reminder emails so you’ll always know when it’s time to change your filter.
I have a sticker filter indicator. How do I track my Brita Elite™ Filter life?
If your sticker indicator looks like the image below, you’re all set to track Elite™ Filter life. See instructions below.
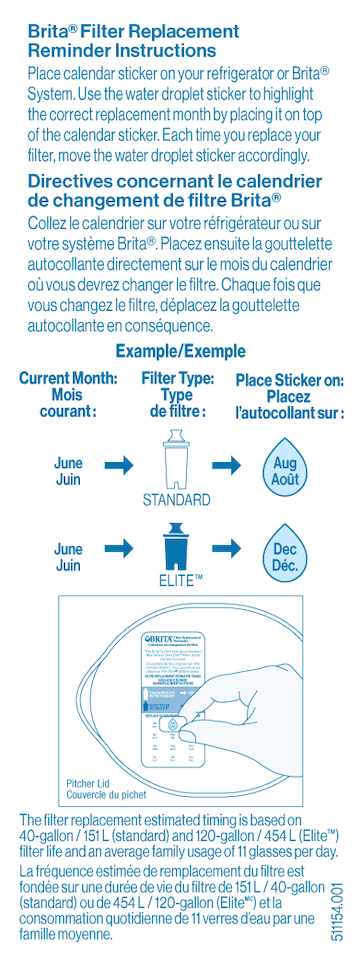
If your sticker indicator does not look like the image, it’s an older version. But, you can still use this indicator to track Elite™ Filter life. Place the right side of the sticker on top of the month six months after you change your filter. For example, if you change your filter in January, place the left side of the sticker over “Jan” and place the right side of the sticker diagonally over “June.” Then you’ll know to change your filter in June. To track your filter life, you can sign up for personalized filter change reminder emails so you’ll always know when it’s time to change your filter.
The shelf life of an unused, sealed filter is indefinite. Filters should be kept in the sealed Brita® bag and stored in a cool, dry place until you’re ready to use it.
If your Original (Standard) (white) Brita® Filter is more than a year old, we recommend soaking it for 15 minutes before first use.
Get all the details at How Brita® Filters Work.
Care & Maintenance
Brita® pitchers are easy to maintain. Hand-wash the pitcher/dispenser, lid and reservoir periodically with a mild detergent—never with abrasive cleaners—and rinse well. Always remember to remove and set aside filters before washing.
When reassembling your pitcher after cleaning, be sure to correctly reinstall your reservoir and lid. The reservoir has a vent hole in the area that holds the filter. Make sure the vent is facing the back of the pitcher. For lids, the Fill Lid feature should be positioned toward the back.Store your Brita® pitcher in a cool, dim place. Don't keep your Brita in bright sunlight, as it can cause algae to grow. Keep your Brita in the refrigerator if you plan to be away for longer than a couple of days.
Brita® pitchers and dispensers are NOT dishwasher safe. Hand wash the pitcher/dispenser, lid and reservoir periodically with a mild detergent—never with abrasive cleaners—and rinse well.
Plastic Brita® Premium Filtering Water Bottles are dishwasher safe (top rack only). Our Stainless Steel Premium Filtering Water Bottles are NOT dishwasher safe, and should be washed by hand. Always remember to remove and set aside filters before washing.
One possible cause for an apparent leak may be overfilling. Do NOT fill with water past the max fill line on bottles and pitchers. Water can overflow into or over the handle when you pour resulting in what appears to be a reservoir leak.
We stand by our products and offer a 30-day unconditional 100% money-back guarantee and a 1-year warranty in case your Brita gets damaged. Your satisfaction is important to us, whether or not your Brita® product is under warranty. Visit our Help Page or call 1-800-24-BRITA or 1-800-387-6940 (Canada) for support.
Yes. Brita partners with TerraCycle® to offer a free recycling program for Brita® Pitchers, Dispensers, Bottles, Faucet Systems, Filters and filter packaging. Visit the Brita Recycling page to get started.
Complete the form on the recycling page, and we’ll provide a free shipping label. Make sure any waste in your Brita products is dry before you pack them in a box and mail. We’ll take it from there. (Tip: Place the Brita® products you’re shipping in a garbage liner or trash bag inside the shipping box.) If you have questions about recycling or shipping labels, please contact Customer Service.
Yes. All Brita® pitchers, dispensers, Premium Filtering Water Bottles, Water Filter Faucet Systems and replacement filters are made without BPA.
Seeing carbon particles in the pitcher after several weeks of use is normal with our older filters.
Brita® products are designed and built to last, but like anything, they can crack, break or fail. We stand by our products and offer a 30-day unconditional 100% money-back guarantee and a 1-year warranty in case your Brita gets damaged. Your satisfaction is important to us, whether or not your Brita® product is under warranty. Visit our Help Page, or call 1-800-24-BRITA or 1-800-387-6940 (Canada) for support.
Avoid filling above the MAX FILL line. The purpose of this line is to help you avoid overfilling the reservoir, which can cause water to spill into the handle and leak out of the pitcher.
Purchase online here or check out our complete list of retailers.
For models that feature our Electronic Filter Change Indicator, Brita uses a Lithium Manganese Dioxide (Li/MnO₂) battery, which is a type of lithium-ion battery.
Currently, the following Brita models use this battery type:
Brita Champlain Pitcher Model No. OB61
Brita Denali Pitcher Model No. OB62
Brita Marina Pitcher Model No. OB47
Brita Pacifica Pitcher Model No. OB41
Brita Tahoe Pitcher Model No. OB60
Brita Ultramax Pitcher Model No. OB24
Brita Wave Pitcher Model No. OB53
Brita Everyday Pitcher Model No. OB46
Brita Metro Pitcher Model No. OB11
Brita Faucet Mount Model No. FF-100Manuals & Warranties
We stand by our products and offer a 30-day unconditional 100% money-back guarantee and a 1-year warranty in case your Brita gets damaged. Your satisfaction is important to us, whether or not your Brita® product is under warranty. Visit our Help Page or call 1-800-24-BRITA or 1-800-387-6940 (Canada) for support.
- Brita® Filter User Guide (Elite Filter, Shasta Indicator)
- Brita® Filter User Guide (Original(Standard) Filter, Shasta Indicator)
- Brita® Filter User Guide (Elite Filter, SmartLight Indicator)
- Brita® Filter User Guide (Original(Standard) Filter, SmartLight Indicator)
- Performance Data Sheet for Brita® System with Elite Filter
Brita Stream® Pitchers
The Brita Stream® with Filter-As-You-Pour™ Technology delivers great-tasting water when you want it. Brita Stream® is a unique offering that functions differently from Brita Original and Elite pour through system filters. Brita Stream® Filters only work with Brita Stream® pitchers and dispensers. Learn more about our different pitcher and filter offerings here.
No. Brita Stream® products only work with Stream Filters. Stream Filters attach to the lid of a Stream Pitcher and feature Filter-As-You-Pour™ Technology.
Replace your Brita Stream® Filter every 40 gallons, or about every 2 months. If you have hard water, you may need to change filters more often. When you install a new filter, use your built-in electronic filter indicator or SmartLight™ filter indicator so you’ll know exactly when to replace it. See how often to change other types of Brita® filters here.
- Flush your new Brita Stream® filter with cold water for 15 seconds.
- Insert filter into filter cage with blue ring facing up. Press filter until it clicks.
- Install filter cage onto lid with a firm twist.
- Activate electronic indicator. Fill pitcher and enjoy great-tasting water.
You’ll find a wrapped filter inside the cardboard base of your pitcher’s carton.
